How to Make a Tie for Baby Bootie
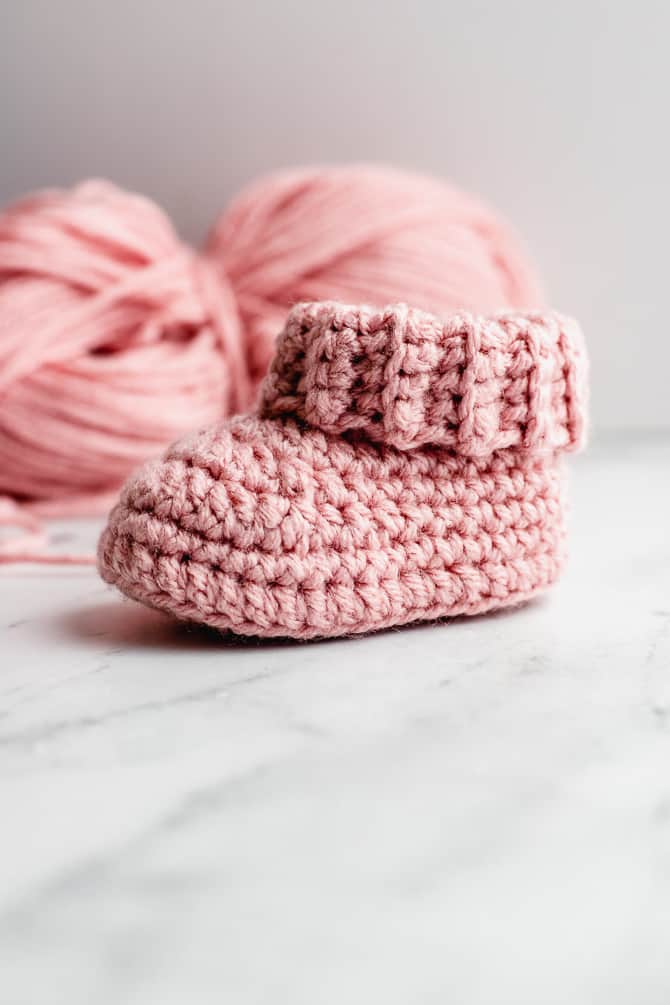
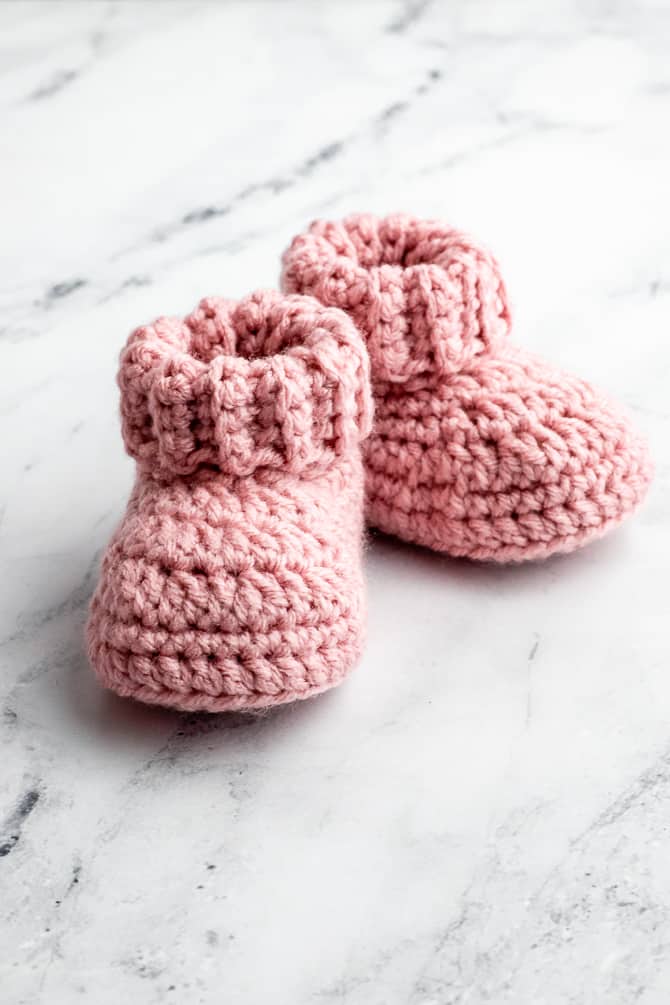
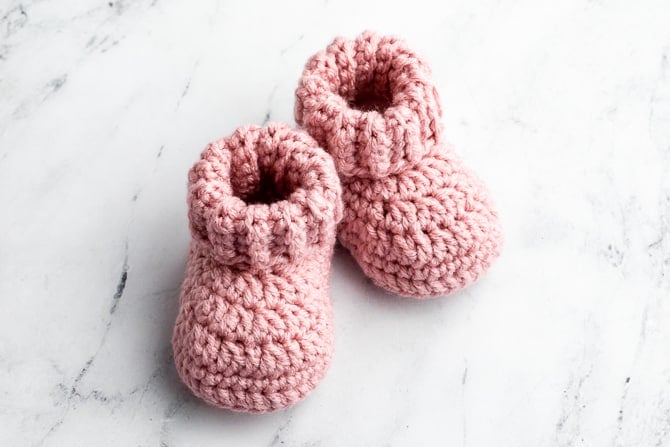
Crochet a pair of these cute and archetype infant booties to welcome a new little one into the world! This free crochet blueprint will teach you how to brand soft and stretchy crochet booties that will be comfy for baby to article of clothing. These like shooting fish in a barrel crochet infant booties are then cute, and make the perfect souvenir for a new infant girl or baby male child.
Crochet Baby Booties Blueprint
Are you looking for a beautiful and classic crochet baby design? Then this gratuitous baby bootie crochet pattern is perfect for you. These cute niggling booties are an adorable babe shower gift, and a peachy addition to any newborn'due south wardrobe.
This professionally edited pattern will teach you everything you need to know to make classic baby booties. It'southward an piece of cake pattern made with basic crochet stitches, so it's perfect for beginners and advanced crocheters alike. Information technology's a gender-neutral pattern that yous tin can customize to adapt the little girl or boy in your life. And of form, you tin can conform the pattern to fit all dissimilar sizes of petty anxiety.
Why I beloved this pattern:
The booties have a ribbed, fold-downwards cuff to proceed footling feet warm and cozy without sacrificing style. (The stretchy ribbing also helps the booties stay on tiny feet!) I also like that these booties are made with worsted weight yarn, so they work upward quickly when yous demand a last-infinitesimal present.
You can find the ad-gratuitous, printable PDF pattern right here.
Best Yarn for Infant Booties
Infant booties are such a special particular, and I'thousand certain y'all want to choose the best yarn for this projection.
When thinking about what type of yarn to employ to make baby booties, choose something that is super soft, hypo-allergenic, and washable.
Wool yarns can be too scratchy for babies' soft skin. And cotton wool yarns tend to work up too stiff.
So, premium acrylic yarns are a great option for making crochet infant shoes. Yarn with a smooth, soft texture tends to be the best choice for babies. To decide if your yarn is soft enough, rub it on your cheek or neck. If information technology feels soft to you lot, it will be soft enough for the baby's feet too.
I chose to employ a worsted weight yarn for this blueprint. For these booties, I like to use Big Twist Soft Yarn from Joann and Lion Brand Basic Stitch. I've likewise used Caron Simply Soft, but find that I need to apply a larger hook to run across gauge. Y'all can choose whatever brand you similar best, as long as you lot bank check your estimate.
Cute Baby Shoes Pattern
I know a lot of people outset learning crochet to make items for a new baby. When designing this pattern, I wanted to create an easy beginner-friendly baby bootie pattern that moms would love.
This is a simple, modern babe bootie pattern that is perfect to brand for baby shower gifts, baby's first Christmas, and other occasions. Information technology's a gender-neutral design that you tin customize with different colors of yarn
Baby Booties Size Chart
Every bit I'm certain you know, all babies grow at dissimilar rates. For the most accurate fit, see if y'all can measure your infant's pes. Retrieve to add up to a one-half-inch of extra wiggle room in guild to calculate the correct sole size.
To bank check your gauge, I recommend working up the unabridged sole section of the pattern and measuring its length. (The sole section is only 3 rounds, and then information technology volition go quickly!) That way, you'll know if you need to go upwards or down a hook size.
| Historic period | Sole Size | Recommend Claw |
| Newborn | 3.5 | E/3.5mm |
| 0-3 Months | 3.75 | G/4mm |
| 3-6 Months | iv.25 | H/5mm |
| 6-12 Months | 4.75 | J/6mm |
Classic Infant Booties Crochet Pattern
Difficulty: Beginner to Easy
Finished Size: three months (3.75″ sole length) See the nautical chart above for more sizes.
Materials
Yarn: Worsted weight yarn (Category 4)
Crochet Hook: G/4mm hook to brand a 3.75″ long bootie
You'll also need:
- yarn needle
- stitch markers, if desired
- ruler or tape measure, if desired
Stitches and Abbreviations
- sl st – skid stitch
- st/sts – sew together/stitches
- ch – chain
- sc – single crochet
- hdc – half double crochet
- dc – double crochet
- sc2tog – single crochet two stitches together
- hdc2tog – one-half double crochet ii stitches together
- dc2tog – double crochet two stitches together
- BLO – back loops only
Special Stitches
I find that regular hdc2tog stitches can look a little too beefy, especially for small projects like baby shoes. Here is a different way to brand a one-half-double subtract in an invisible fashion.
If yous are familiar with invisible unmarried crochet decreases for amigurumi, this is similar.
Invisible HDC decrease:
Step 1: Yarn over.
Step ii: Insert the hook into the front loop of the first sew together of the decrease.
Step 3: Insert the hook into the front loop of the next stitch of the decrease.
Step four: Yarn over and draw through the first two loops on claw.
Pace v: Yarn over and depict through the last 3 loops on hook.
You tin utilise this sew together whenever I phone call for a hdc2tog decrease in the design.
Blueprint Notes
- This pattern is written in Us/American terms.
- The sole and the upper department is written in joined rounds. (Y'all will not plow the work in betwixt rounds.)
- The cuff department is written in rows. (Y'all volition turn the work in betwixt rows.)
- Use a stitch marker to mark your commencement stitch of the row/round.
- At the end of each round, join the round with a slip sew together to the first sew of the same round.
- Chain 1 to begin a round. Chain ane does not count as a stitch.
How to Read a Crochet Design
Crochet patterns are written using many abbreviations and terms, which save space and brand patterns easier to read. Here are some tips:
- Unless the pattern indicates otherwise, assume that you move on to the next sew. For example, "3 hdc" means to work ane hdc into each of the next iii stitches. If the blueprint wants you to work 3 dc all into the same place, it will say "three dc in adjacent st"
- ( ) Parentheses are used to betoken a grouping of stitches that are to be worked together into a stitch.
- [ ] Brackets are used to tell you how many times to piece of work a certain step. The number immediately following the brackets tells you lot how many times to practise the step.
For more than beginner tips, make sure to read How to Crochet: A Complete Guide for Beginners

Sole Section
Circular 1: Ch 10. In the second ch from the hook, brand ii hdc. vii hdc. In the last ch, make 5 hdc. Continuing effectually the other side of the starting ch, brand seven hdc. Brand ii hdc in the last ch. Join with a sl st to the top of the first hdc. (23 sts)
Round ii: Ch 1. In the same st, brand 2 sc. 2 sc in the next st. 4 sc, iii hdc. two hdc in each of the side by side 5 sts. 3 hdc, four sc. 2 sc in each of the next 2 sts. Join with a sl st to the peak of the first sc. (32 sts)

Round 3: Ch ane. Starting in the first run up, [one hdc, 2 hdc in the next st] ii times, 7 hdc, [ane hdc, 2 hdc in the next st] two times, 2 hdc in each of the next 2 sts, [1 hdc, 2 hdc in the next st] ii times, 7 hdc, [1 hdc, 2 hdc in the next st] two times. Join with a sl st to the meridian of the first hdc. (42 sts)

Upper Section
The upper section is done in joined rounds. Each circular will begin with a ch-1, which does not count as a sew together.
Important: Start each circular by making the outset crochet stitch into the aforementioned stitch as the slip sew join, i.e. the get-go run up of the round below. Proceed around.
When you get to the end of the round, join to the first sew with a slip sew.
Here is a motion picture to illustrate the joins.

Round 4: Ch 1. (Does not count every bit a stitch here, or in the rounds that follow.) Hdc blo in the same st and in each st around. Join with a sl st to the top of the starting time hdc. (42 sts)
Circular 5: Ch one, sc in the same st and in each st around. Bring together with a sl st to the top of the offset sc. (42 sts)
Round vi: Ch 1, sc in the same st and in the next 10 sts, hdc, [hdc2tog, hdc] ii times, [dc2tog, dc] three times, dc2tog, [hdc, hdc2tog] two times, hdc, 6 sc. Join with a sl st to the pinnacle of the first sc. (34 sts)
Circular 7: Ch 1, sc in the aforementioned st and in the adjacent 12 sts, hdc, hdc2tog, 4 dc2tog, hdc2tog, hdc, 7 sc. Join with a sl st to the pinnacle of the first sc. (28 sts)
Round 8: Ch 1, sc in the same st and in the next 11 sts, hdc, 4 dc2tog, hdc, vi sc. Bring together with a sl st to the summit of the commencement sc. (24 sts)
Notes: Some readers have said they are having trouble with their decreases looking asymmetrical, or off-heart. Hither are some suggestions:
- Showtime, and most importantly: The offset stitch of each round must exist made in the same run up equally the ch-1.
- Second, exist enlightened that the last stitch of Round v will be almost 2-iii run up lengths to the correct of centre. This is normal – the shifting seam is caused by the shape of crochet stitches – especially the hdc stitches. To recoup for the slanted seam, I've start the subtract section in Circular 6. This moves the decrease department over a few stitches then that the decreases line up exactly with the centre midline of the sole.

Ribbed Cuff Section
The cuff section is worked in rows. Rows of dorsum-loop unmarried crochet create a flexible ribbing that you tin fold down to make a gage.
Note: The rows of ribbing are anchored to the previous round ("Upper" Round 8) past making a slip stitch at the starting time or end of the row.
Row ane: Ch 9. Starting in the 2nd chain from the hook, sc 8. (8 sts)

Slip stitch into the next stitch of Round 8 of the Upper Section. This sideslip stitch anchors the row of single crochet you lot just made to the stitches from the last round of the bootie'south upper section.
Then, make some other slip sew together into the next stitch of Round 8 of the Upper Department. This 2nd skid sew together counts equally the turning chain for the side by side row.
Row 2: Don't chain i, as the slip run up you've merely fabricated counts as your turning chain. Rotate the bootie counterclockwise and so that your working yarn crosses in front of your work. Laissez passer the working yarn in front of your claw and to the back of your work. (See the movie above for clarification.)
Tip: I accept this actress step of turning the work counterclockwise and passing the yarn in front of the hook to minimize a bump you tin go when working this add-on ribbing technique.
Starting in the third sew from your claw (remember, skipping over those two skid stitches) make 8 sc-blo.
Row 3: Ch one and turn. Starting in the second run up from the hook, make eight sc-blo. Slip run up into the next stitch from "Upper" Circular 8. Make another slip sew together into the side by side sew together from "Upper" Round 8.
Row four, and all even rows: Follow directions from Row 2.
Row 5, and all odd rows: Follow directions from Row iii.
Finishing
When yous have made 24 rows of ribbing, cut yarn and pull information technology through.
Go out a long tail of yarn and use it to seam the two ends of the ribbed cuff section.

And at that place you go, yous've made adorable baby booties that whatsoever mom-to-be volition honey.
Accept questions? Join the Facebook Grouping!
I hope this commodity was useful for you! If you have whatever additional questions, feel complimentary to join my Facebook Group. I created this group for you to share pictures, ask questions, and help each other out.
What's Next?
Pin this mail service: Relieve this tutorial to your Pinterest boards so that you lot can come back to information technology after.
Get out a comment: I dear to hear your feedback. Tell me in the comments below!
Share on Instagram or Facebook: When you make this project, share it on social media and tag me @sarahmaker. I love to see what you make!
Explore More Crochet Ideas
If you honey to crochet, you'll love these other articles and free patterns.
- 27 Gratis Crochet Baby Blanket Patterns
- Easy Crochet Hat Pattern – Chunky Ribbed Beanie
- 25 Free Easy Crochet Scarf Patterns for Beginners
- How to Crochet a Granny Square: Step-by-Step Tutorial for Beginners
Instructions
- Sole Section Round 1: Ch x. In the 2nd ch from the claw, make 2 hdc. 7 hdc. In the final ch, make v hdc. Standing around the other side of the starting ch, brand 7 hdc. Make 2 hdc in the last ch. Join with a sl st to the top of the starting time hdc. (23 sts)
- Round ii: Ch ane. In the same st, make 2 sc. ii sc in the next st. 4 sc, iii hdc. two hdc in each of the adjacent 5 sts. 3 hdc, four sc. 2 sc in each of the next two sts. Join with a sl st to the top of the first sc. (32 sts)
- Round 3: Ch ane. Starting in the outset stitch, [1 hdc, 2 hdc in the next st] two times, vii hdc, [ane hdc, 2 hdc in the next st] two times, ii hdc in each of the next 2 sts, [1 hdc, 2 hdc in the side by side st] two times, 7 hdc, [one hdc, two hdc in the side by side st] two times. Join with a sl st to the top of the first hdc. (42 sts)
- Upper Department Round four: Ch 1. (Does not count every bit a stitch here, or in the rounds that follow.) Hdc blo in the same st and in each st around. Bring together with a sl st to the height of the first hdc. (42 sts)
- Round 5: Ch ane, sc in the aforementioned st and in each st around. Join with a sl st to the top of the first sc. (42 sts)
- Round 6: Ch ane, sc in the same st and in the next 10 sts, hdc, [hdc2tog, hdc] ii times, [dc2tog, dc] three times, dc2tog, [hdc, hdc2tog] two times, hdc, six sc. Join with a sl st to the meridian of the first sc. (34 sts)
- Round seven: Ch 1, sc in the aforementioned st and in the side by side 12 sts, hdc, hdc2tog, 4 dc2tog, hdc2tog, hdc, 7 sc. Join with a sl st to the elevation of the first sc. (28 sts)
- Round eight: Ch 1, sc in the aforementioned st and in the next xi sts, hdc, four dc2tog, hdc, 6 sc. Join with a sl st to the top of the first sc. (24 sts)
- Cuff Section Row 1: Ch 9. Starting in the second chain from the hook, sc 8. Slip run up into the next stitch of Round 8 of the Upper Section.
- Row ii: Slip stitch into the next stitch of Round eight of the Upper Section. Turn, do non ch 1. 8 sc-blo.
- Row 3: Ch 1 and plow. eight sc-blo. Skid stitch into the adjacent sew from the previous circular.
- Row 4, and remaining fifty-fifty rows: Follow instructions in row 2.
- Row 5, and remaining odd rows: Follow instructions in row 3.
- When you have made 24 rows of ribbing, cut yarn and pull information technology through. Leave a long tail of yarn and use it to seam the ii ends of the ribbed cuff department.
Notes
- The Upper Section is done in joined rounds. Each round will begin with a ch-1, which does not count as a run up.
- Starting time each round of the Upper Section by making the get-go crochet run up into the same sew together as the ch-1. Proceed effectually. When you lot get to the end of the round, join to the get-go stitch with a slip sew together.


Sarah Stearns has helped thousands of makers detect their next arts and crafts project with free patterns and step-past-stride tutorials on her blog, sarahmaker.com. Read more.
Her work has been featured in Scientific American, Good Housekeeping, Voice, Flat Therapy, and more.
How to Make a Tie for Baby Bootie
Source: https://sarahmaker.com/classic-crochet-baby-booties/